Image Map

Friday, October 31, 2014

I needed a little inspiration...

This was my inspiration! The Yellow Cape Cod blogged about a makeover done by whitewashing brick. I debated about whether I could do it.

You see I am impatient! If I start a project I want it completed. I searched the internet for directions and got several lots of different techniques. The type of paint ended up being confusing also. I finally decided I could do it. And did. It was a quick makeover. 


And my next inspiration came from Rhoda over at Southern Hospitality. Oh her house renovation has been so exciting to watch over the last two years. 
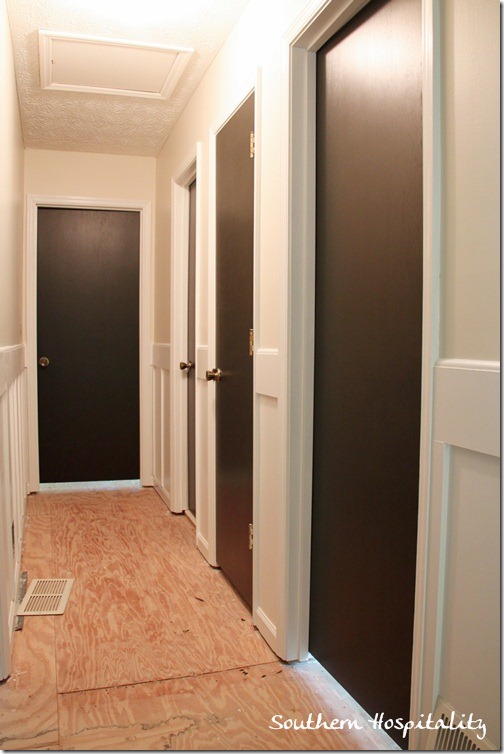
black doors hallway

040


This is how she added trim to her hallway. My house is a 79 split entry also, Back in the day when long hallways led to the bedrooms and baths. This picture shows her trim before the hardwood floors. 
My hallway already had a chair rail that I added several years ago. Since it was too low for board and batten I decided to go with the picture frame moldings. One short afternoon project for me since I did the cutting and nailing via the trusty nail gun. Mr. Spouse did the chalking and I touched up the paint. (I painted with semi-gloss in ultra white prior to adding the boxes. 


All in all, these are two transformations that have made me smile! And they are inspired from others!


post signature

Wednesday, October 15, 2014

Annie Sloan Graphite Try

I know. Chalk paint isn't new. It has been raved about. I have pinterested it. And googled it. Read directions. Watched youtube videos.

I think I can. I want to try. Take a few deep breaths.

First thing is to decide on a color. Since the piece I am doing is in the kitchen it needs to blend in with the cabinets and granite counter tops.

I decided on graphite--- a dark gray as in pencil lead. I read and decided this after reaching this as my inspiration.


I wanted a dark contrast in the cabinet with my white stoneware. I purchased this cabinet from JCPenney several years ago. It was on closeout and was about $50. The odd part was that the top two shelves had a back and the bottom shelf didn't.

 I purchased the thinest panel Lowe's had and let them cut it to size.
 I attached it to the back before I began painting.
 As you can tell, it was really odd looking with that open space.
I found out that I need to learn a bit more about chalk painting. But I love the fact that it is a doable project in one day. With other finishes the drying time between coats seems to take forever. And I.do.not.like the mess during projects. (Neither does my dog--he pouted all day!) I put the first coat on and let it dry for about a hour while I took a break. I put the second coat on. About a hour later I put the first coat of clear wax. I buffed it and applied a second coat of wax a few hours later. By the end of the day I buffed it again and placed everything back!


I will definitely use chalk paint again. A couple of things I would do next time is use a really good brush and realize that I should thin the paint with a little water if I want an overall finish with little distressing.


post signature

Friday, October 10, 2014

Making Pillows The Easy Way

There is a very easy way to make pillow covers. If I can do it, then you can! I used to make pillows by making permanent covers. Well, I ran out of space to store those pillows. Pillows here, pillows there, pillows everywhere! In the garage. In the closets. On every bed.

I finally got wise desperate and decided that a pillow cover is easier to store. Fold. Place in a drawer. Done.

Now I knew I couldn't go the zipper sewing route. No way! A few months ago I bought a couple of pillow covers at Hobby Lobby during their 50% off weeks. Loved those but that limited me to what they had in mind for decor.

Google to my rescue.  I read this link. One rectangle per pillow. Iron the ends. Sew the ends. Fold. Sew the sides. Turn right side out and stuff that pillow form inside. My kind of work!


Step one was easy since I actually iron frequently. I folded the ends and ironed so the sewing would look neat. 


Step two was sewing the end seams.


I wanted to make sure that the design of the fabric was centered when I finished. By using this one long rectangle it gave me the opportunity to work with the "envelope" by folding where I desired. If I had used a separate piece for the front, it would have had some fabric waste. This method used 18" of the width of the fabric.
As I folded it for the final seams I worked with it by shifting where each fold would be. I turned it over to check that the pillow front would be centered and show the design.


Ready now! I did sew all three sides. That produced a finished look.

 All centered to suit my OCD.


I like the way the gray in the pillows picks up the gray in the area rug and the drapes. Score!


Fabric: Hobby Lobby 40% off   $10
Solid pillows: Hobby Lobby 50% off ($3.50 each)


post signature

Wednesday, October 8, 2014

Mixed up seasons?

It is October in Tennessee. I know we are considered a southern state but it gets cold here. We have four seasons.


Now that it is October (duh) the trees are turning, leaves are beginning to fall, and the   growing season is ending. My hydrangeas must not know this. 

I have waited all summer for blooms. Usually by June I am cutting the blossoms for glorious flowers to enjoy indoors. By September I am cutting and drying blossoms to keep. Not. this. year.
Nada a bloom. Lots of growth--just no blossoms. Until now. October. Frost is coming soon.

This is what I see now:


Blooms--oh so tiny. Not just one. Several.
But, will they have time?

I have my doubts. 

Should I tell them they have waited a little too long to put on their show?


post signature